Build a Simple IOT Weather Station 4 Steps Circuit Diagram Today, we will have a look at How to Build an IoT-Based Weather Station in Raspberry Pi 4, we will provide the complete code and schematics for this project. However, this Internet of Things (IoT) project aims to create a real-time Raspberry Pi weather station that displays the current humidity, temperature, and pressure values via an LCD The complete circuit for Arduino based IoT Weather Station is shown below. The DHT11 sensor is powered by the 5V pin of the Arduino and its data pin is connected to pin 5 for one-wire communication. The BMP180 sensor is powered by the 3.3V pin of Arduino and its data pins SCL
The parameters are displayed on the Blynk IoT platform both on the Web Dashboard as well the Phone App in the form of live values and charts. This can be a good project to get started with IoT. Hardware and connection part is easy. Code and setup part is just a bit lengthy so read the instructions carefully till the end to make sure everything

Based Weather Station in Raspberry Pi 4 Circuit Diagram
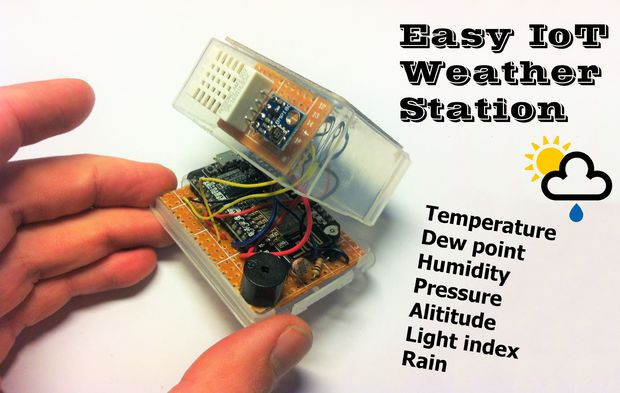
The main aim of this project is to create an online weather system dashboard based on Ubidots, which enables a user to check real-time weather parameters of a place anytime and anywhere with just a few buttons click. So, let's get started! Here's what you'll need. Materials Required. The following hardware and software will be required in this Building your own IoT weather station at home is an exciting way to explore IoT and meteorology. With real-time weather monitoring, historical data tracking, and smart home integration, this project is both educational and practical. By following this guide, you can set up a smart weather station and enhance it over time. This Weather Station tutorial is part of a joint project developed with my friend Mauricio Pinto. Here, we learned how to capture several important data, related to weather, as Air Temperature and Humidity, Pressure and UV. Another very important data to be added to a Weather Station are Wind Speed and Direction.

In recent years, IoT-based weather stations have gained popularity due to their ability to provide real-time weather data. With the advancements in IoT technologies, building a weather station using off-the-shelf components has become easier. In this article, we will build an IoT-based weather station using ESP32 and Node-RED. Learn how to build an IoT weather station with an ESP32. This step-by-step guide covers all the necessary components, setup, coding, and deployment for monitoring weather conditions. IoT Weather Station The Internet of Things (IoT) has dramatically transformed how we interact with and monitor our environment. Whether it's smart homes or wearable devices, IoT technology
Building an IoT Weather Station with ESP32: A Step Circuit Diagram
Learn how to build a personal weather station using Raspberry Pi 5 to monitor temperature, humidity, and atmospheric pressure in real-time. This guide covers essential components, sensor setup, coding, and data visualization. Perfect for DIY enthusiasts, this project offers valuable insights into weather patterns while enhancing your skills in electronics and programming. Personal Weather Station In this article, we'll walk through how to create a simple weather station using an ESP8266 Wi-Fi module and a 0.96″ OLED display.By fetching weather data from the OpenWeatherMap API, we will display live weather information, including temperature, conditions, and more, right on your OLED display.This project is perfect for beginners in electronics and IoT development.
